PixARK – Hosting a Dedicated LAN Server

Hosting a Dedicated LAN Server and Playing on The Same Computer
1. Getting the server files
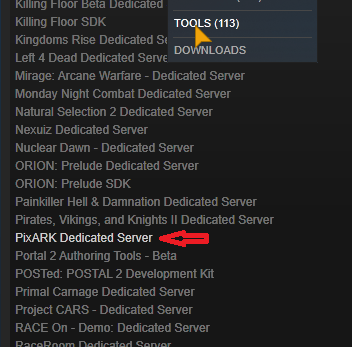
1. Open the steam client and From the library menu select Tools.

2. Find Pixark Dedicated Server and right-click and install it like any other game.
Once the files are downloaded, right-click the dedicated server from the left panel and go to its Local directory.
2. Setting up the .bat file for starting the Server
Once you are in the root directory of server installation(eg: \steamapps\common\PixARK Dedicated Server)
Steps:
1. Go to \ShooterGame\Binaries\Win64
2. Create a new text file (name it startLAN or anything you want)
3. Open the .txt file and there enter this line
start “” /NORMAL “DRIVELETTER:\PATH” “CubeWorld_Light?listen?MaxPlayers=4?Port=27015?QueryPort=27016?RCONPort=27017?SessionName=YOURSERVERNAME?ServerPassword=Password123?ServerAdminPassword=YOURADMINPASS” -NoBattlEye -nosteamclient -game -server -CubePort=14999
Do note:
DRIVELETTER=Drive or partition you installed the server from steam
PATH=complete path to pixarkserver.exe root folder(eg : Steam Games\steamapps\common\PixARK Dedicated Server\ShooterGame\Binaries\Win64\PixARKServer.exe)
YOURSERVERNAME=The name of the server you want
YOURADMINPASS=your admin pass(for enablecheats console command)
Password123=Your server pass(not really needed as this is for LAN and singleplayer)
4. Save the .txt file and change extension from .txt to .bat(by renaming)
P.S battle-eye is disabled to help with performance.
3.Adding Specific Windows Firewall Exception
Pixark Automatically created inbound rules however they are not for specific ports so you must create them. Below are 6 easy lines which you can enter into Powershell running as admin and rules will be created.
Steps:
1. Press Win+X and select Powershell (Admin).
2. On the window copy and paste each of these lines and hit Enter key after pasting each line.
New-NetFirewallRule -DisplayName ‘PixarkServerT’ -Enabled True -Direction Inbound -Action Allow -LocalPort 27015-27018 -Protocol TCP
New-NetFirewallRule -DisplayName ‘PixarkServerU’ -Enabled True -Direction Inbound -Action Allow -LocalPort 27015-27018 -Protocol UDP
New-NetFirewallRule -DisplayName ‘PixarkCubeT’ -Enabled True -Direction Inbound -Action Allow -LocalPort 14999 -Protocol TCP
New-NetFirewallRule -DisplayName ‘PixarkCubeU’ -Enabled True -Direction Inbound -Action Allow -LocalPort 14999 -Protocol UDP
After that close the Powershell window.
P.S if using a custom firewall such as any internet security ones, You may have to manually allow access to these specific ports.
4. Starting the server for the first time
Now go to pixarkserver.exe directory and start that .bat file you save on Step 2,
it will start the Server window and a lot of lines of yellow and white text will come up(This is normal).
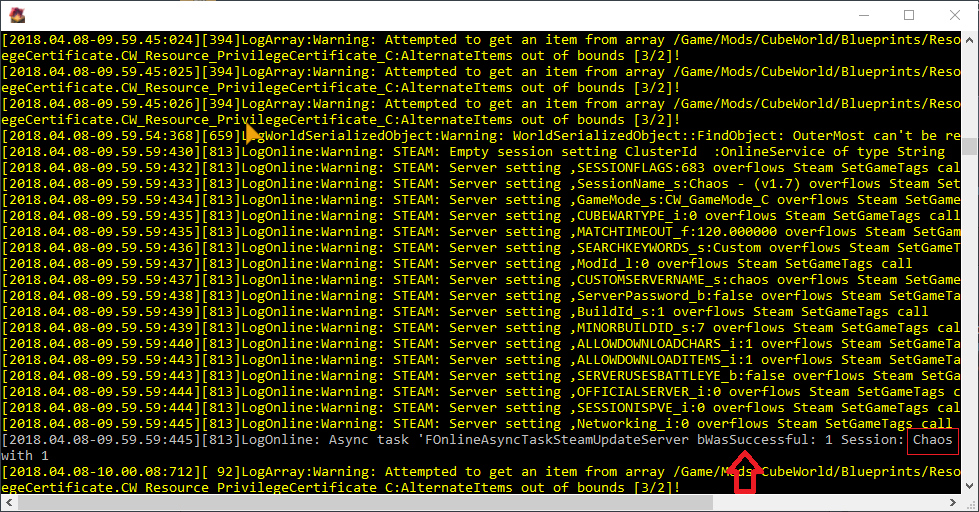
After about 8-10 mins You should see the confirmation line of a successful session(session name will be the one you set in your server instead of Chaos).
The Confirmation line is the red arrow one :

After you see that line it means your server is fully running.
Close the server for now (close it via the cross button) and configure the .ini in the next section.
5. Editing the server configuration to your liking
After closing the Server window, Go to \steamapps\common\PixARK Dedicated Server\ShooterGame\Saved\Config\WindowsServer
Steps:
1. Open GameUserSettings.ini File in a text editor.
2. Find line MaxPlayers= and put 3 or 4 beside the ‘=’ sign (The fewer players, The less RAM usage by server)
3. In [ServerSettings] Para, put a new line: ‘ServerPVE=false'(set it to true for a Fury Server)
4. Save the file.
P.S running with just these settings will put XP, harvest rate, etc to default values you will have to add separate lines under [ServerSettings] para to fine-tune your experience
[ServerSettings]
RCONPort=27017
StructurePreventResourceRadiusMultiplier=1.000000
ResourceDropQuantityMultiplier=4.000000
ResourceRefreshPeriodMultiplier=2.000000
BlueprintTimeToCraftMultiplier=3.000000
TimeForFullRepairMultiplier=1.000000
RaidDinoCharacterFoodDrainMultiplier=1.000000
PvEDinoDecayPeriodMultiplier=0.000000
PvEStructureDecayPeriodMultiplier=0.000000
PvPDinoDecayPeriodMultiplier=0.000000
PvPStructureDecayPeriodMultiplier=0.000000
KickIdlePlayersPeriod=3600.000000
PerPlatformMaxStructuresMultiplier=2.000000
AutoSavePeriodMinutes=5.000000
ListenServerTetherDistanceMultiplier=1.000000
MaxTamedDinos=5000.000000
RCONServerGameLogBuffer=600.000000
AllowHitMarkers=True
DisableStructureDecayPvP=True
DifficultyOffset=0.500000
XPMultiplier=6.000000
HarvestAmountMultiplier=2.000000
AllowThirdPersonPlayer=True
ShowMapPlayerLocation=True
DisableStructureDecayPvE=True
AllowFlyerCarryPvE=True
AllowFlyerCarryPvP=True
DayCycleSpeedScale=2.000000
TamingSpeedMultiplier=4.000000
NoNeedReset=True
ServerPVE=false
6. Connecting to your server
After saving the ini file run the .bat file again(you will have to run it via this every time you want to play SP or LAN) and after seeing the confirmation of the session line in the server.
Steps:
1. Open the steam client and go to View>Servers.
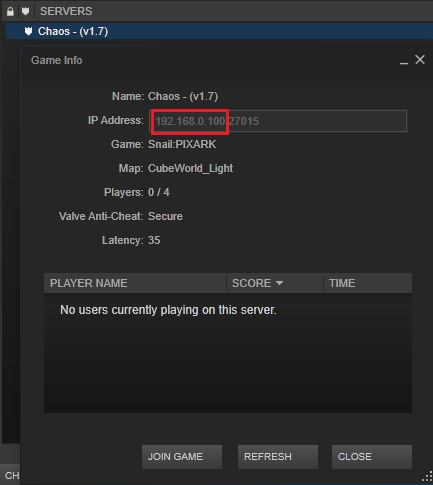
2. Click on the LAN tab and your server will be shown there, Right-click and see server info.
3. Copy just the IP address (Don’t copy the: Port) as seen in the image.

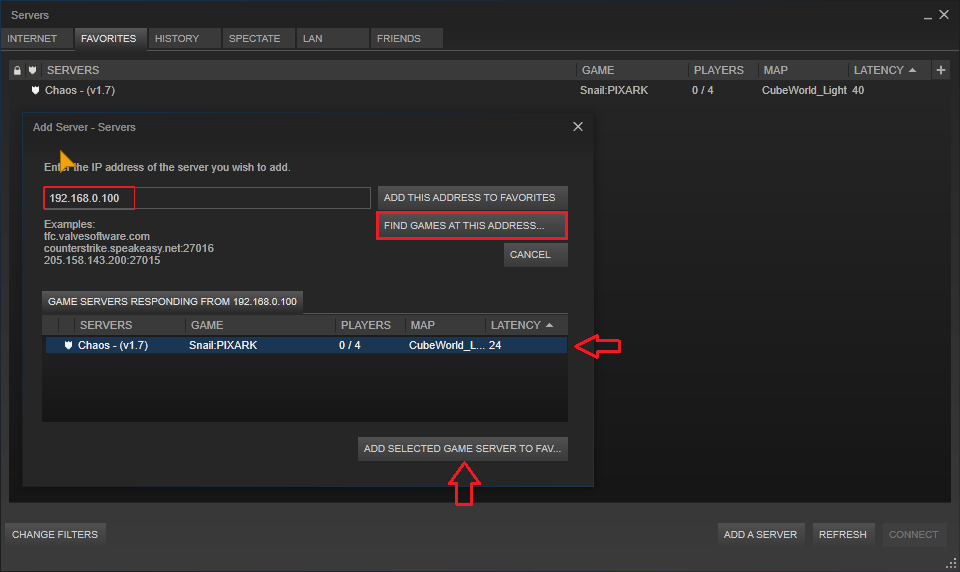
4. Close that info window and go to the Favorites Tab.
5. Click Add server button and paste the IP address in IP adress box and click find games, It should show your LAN server (IF IT SHOWS ‘SERVER NOT RESPONDING’ your Server has not yet fully started or you forgot to add firewall exception at step 6).

6. Click add the selected game server to Fav.
7. Close the steam server finder and open up PixArk Via steam.
8. Click join Pixark and in the bottom window of PixArk and select Favourites from the Drop Down menu.
9. You should see your LAN server and you can click join to join the server.
P.S. The server world will automatically save whenever you close the server window (not the game).
7. (Optional) For LAN play
For playing with LAN you will need a router or switch and the client computers needs to be under the same routed network.
Steps:
1. Start the PixARK server through .bat file.
2. On the client computers do the same thing as you did when connecting to the server in step 6 (Using steam server viewer).
3. In client computers PixARK games, Join the server from favorites.


